Your garage door opener works harder than most homeowners realize. It handles hundreds of open-and-close cycles every year, dealing with mechanical stress, temperature shifts, and constant vibration along the way. Over time, even the most dependable units begin to wear down. When your opener starts grinding, responding slowly, or refusing to cooperate, it is usually a sign that a garage door opener replacement is overdue.
This guide is written for homeowners in Torrance, CA and the surrounding Southern California area who want a clear understanding of the full replacement process. Whether you are planning to handle the job yourself or are preparing to hire a professional technician, knowing what to expect at every stage will help you make smarter decisions and avoid costly surprises along the way.
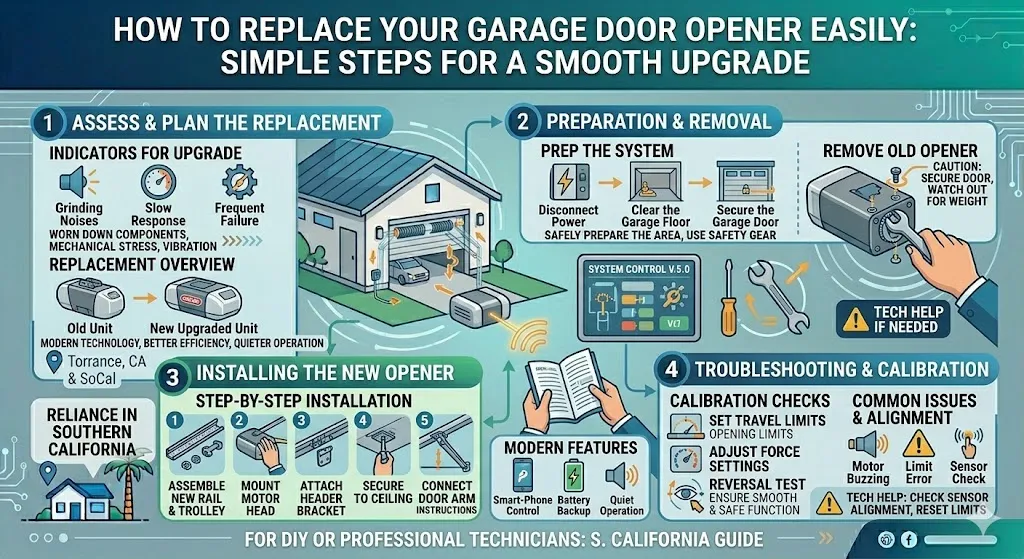
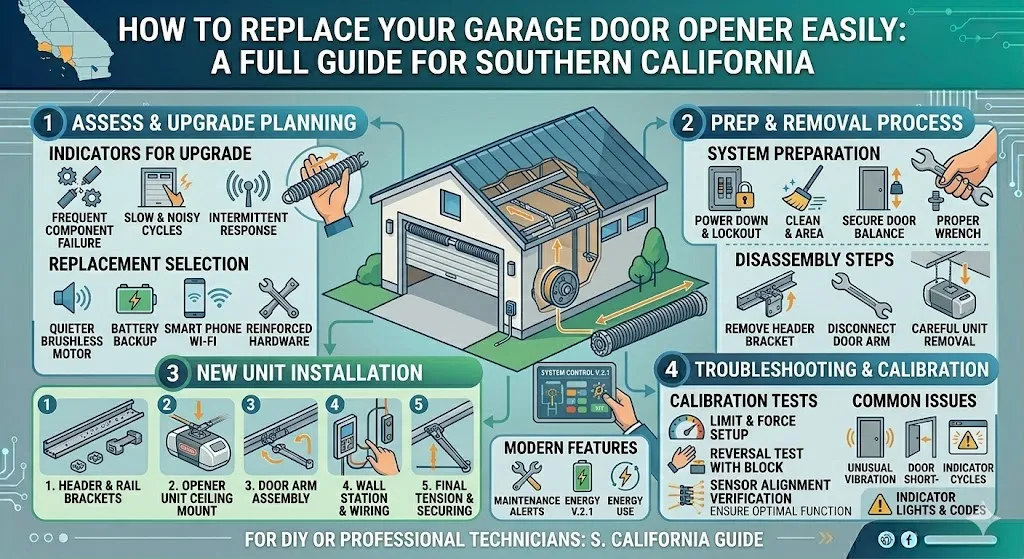
Warning Signs That Tell You It Is Time for a Garage Door Opener Replacement
Not every garage door problem points directly to the opener, but several warning signs clearly indicate a unit that has reached the end of its useful life. Catching these signs early gives you time to plan a replacement before you are dealing with a complete breakdown at the worst possible moment.
Here are the most common signs to watch for:
- Loud grinding, rattling, or banging sounds during operation. These noises often point to worn-out gears, a damaged trolley system, or a motor that is struggling to complete its cycle.
- The door moves slowly or stops in the middle of opening or closing. This typically signals a failing drive mechanism or an aging motor board that can no longer maintain consistent operation.
- The remote or wall button requires several attempts before the door responds. This points to a weakening motor, signal interference, or a deteriorating circuit board inside the unit.
- Your opener is 10 to 15 years old or more. Older units lack modern safety features, including rolling code technology, auto-reverse sensors, and battery backup options.
- The door reverses on its own or refuses to close all the way. While this can sometimes indicate a sensor issue, it is also a sign that the opener’s internal logic system is beginning to fail.
- You notice a burning smell or visible damage around the motor housing. These are immediate red flags that go well beyond a simple adjustment or minor repair.
If two or more of these problems are happening at the same time, a full replacement is almost always the smarter investment compared to patching problems one at a time. Understanding how the mechanics behind your opener affect its overall performance is also useful knowledge for any homeowner. To build that understanding, check out Mastering Garage Door Mechanics: How Do You Adjust a Garage Door Opener Effectively? for a closer breakdown of how opener adjustments and mechanical components work together.
What to Inspect Before Starting the Replacement Process
Going straight into a garage door opener replacement without doing a proper inspection first is one of the most common mistakes homeowners make. Taking 15 to 20 minutes to check a few key areas beforehand can prevent the new unit from developing problems shortly after installation.
Before you start, inspect the following:
- The garage door panels. Dents, warping, or structural damage to the panels can affect how the opener performs from day one. The door itself should be in solid condition before any new opener is installed.
- The garage door springs. Disconnect the opener using the emergency release cord and try lifting the door manually. It should move smoothly and stay in position when raised halfway. If the door feels extremely heavy or drops immediately, the springs need professional attention before the opener replacement proceeds.
- The power outlet near the ceiling. A tripped circuit breaker or a dead outlet is sometimes mistaken for a broken opener. Confirm the outlet is working before assuming the unit needs replacing.
- The track alignment. Bent, misaligned, or debris-filled tracks can cause performance problems even after a brand-new opener is in place. Inspect the tracks for gaps, dents, or dirt buildup.
- The mounting hardware and ceiling brackets. Check for rust, cracks, or looseness in the existing brackets and supports. These components need to be in good condition before the new opener is secured to them.
Skipping this inspection step is a shortcut that often leads to longer troubleshooting later. A solid system foundation ensures the new opener can perform exactly as intended from the start.
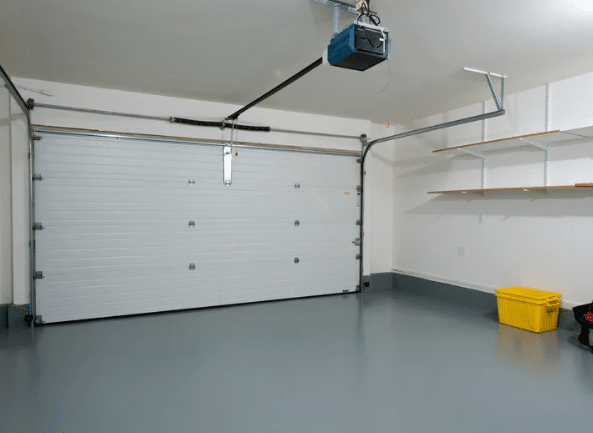
Choosing the Right Garage Door Opener for Your Home
Once you confirm that the door and supporting hardware are in good working order, the next step is selecting the right type of opener. Several options are available, and the best choice for your home depends on your garage setup, noise sensitivity, budget, and how much technology you want built in.
Here are the main types to consider:
- Chain Drive Openers. These are the most affordable and one of the most durable options available. They work well for detached garages but produce more noise, which can be disruptive in homes where the garage shares a wall with a bedroom or living area.
- Belt Drive Openers. These use a rubber belt instead of a metal chain, making them significantly quieter during operation. They are a popular choice among homeowners in Torrance, CA where many properties have attached garages and shared interior walls.
- Screw Drive Openers. These use a threaded steel rod to move the trolley and require less routine maintenance. However, they can be sensitive to temperature changes and may not be the best fit for all Southern California climates.
- Wall-Mounted (Jackshaft) Openers. These mount directly on the wall beside the door rather than hanging from the ceiling. They are an excellent solution for garages with low ceilings or those where overhead storage space is a priority.
- Smart Garage Door Openers. These units come with Wi-Fi connectivity, real-time smartphone notifications, app-based control, and integration with home automation platforms. Smart openers are rapidly becoming the standard in new and upgraded installations because of the added convenience and improved security they provide.
When comparing models, also consider the horsepower rating. Most standard residential doors operate well with a 1/2 HP unit. Heavier or oversized doors typically perform better with a 3/4 to 1 HP opener to handle the added weight consistently and without unnecessary strain on the motor.
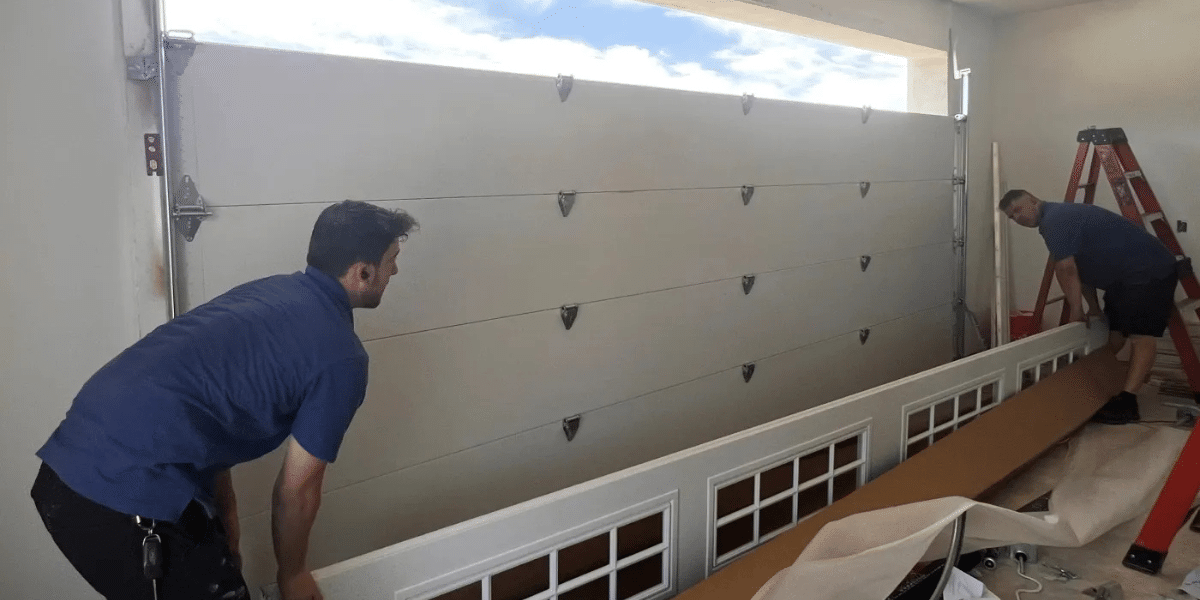
How to Change a Garage Door Opener: A Step-by-Step Breakdown
This section covers what the actual replacement process involves. Changing a garage door opener means safely removing the old unit and correctly installing the new one so it operates reliably and safely from the first cycle.
Here is a clear breakdown of the major steps:
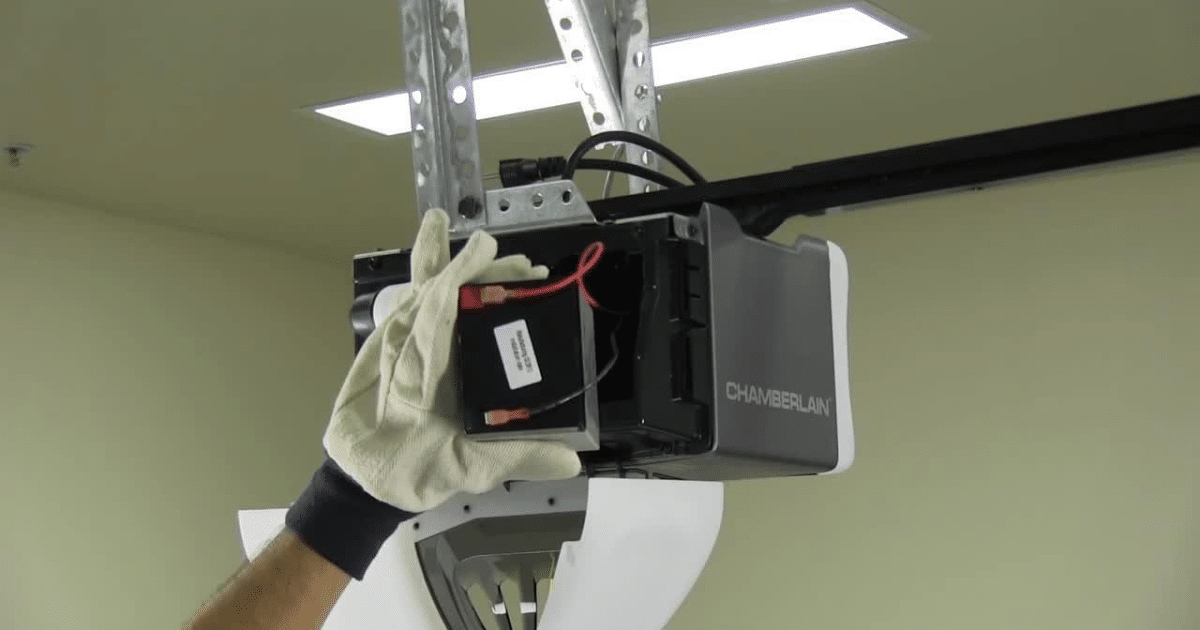
Step 1: Disconnect and Prepare the Old Opener Unplug the existing unit from the ceiling outlet. Pull the emergency release cord to disconnect the trolley from the garage door so the door can be operated manually during the swap.
Step 2: Remove the Old Unit Detach the motor unit from its ceiling mounting brackets. Carefully lower and remove the old rail, trolley, and hardware assembly. Keep the old parts nearby in case you need to reference measurements during the new installation.
Step 3: Assemble the New Rail and Drive System Most replacement units include manufacturer instructions for assembly. Connect the rail sections, attach the new trolley, and thread the chain, belt, or screw drive according to the specific model you selected.
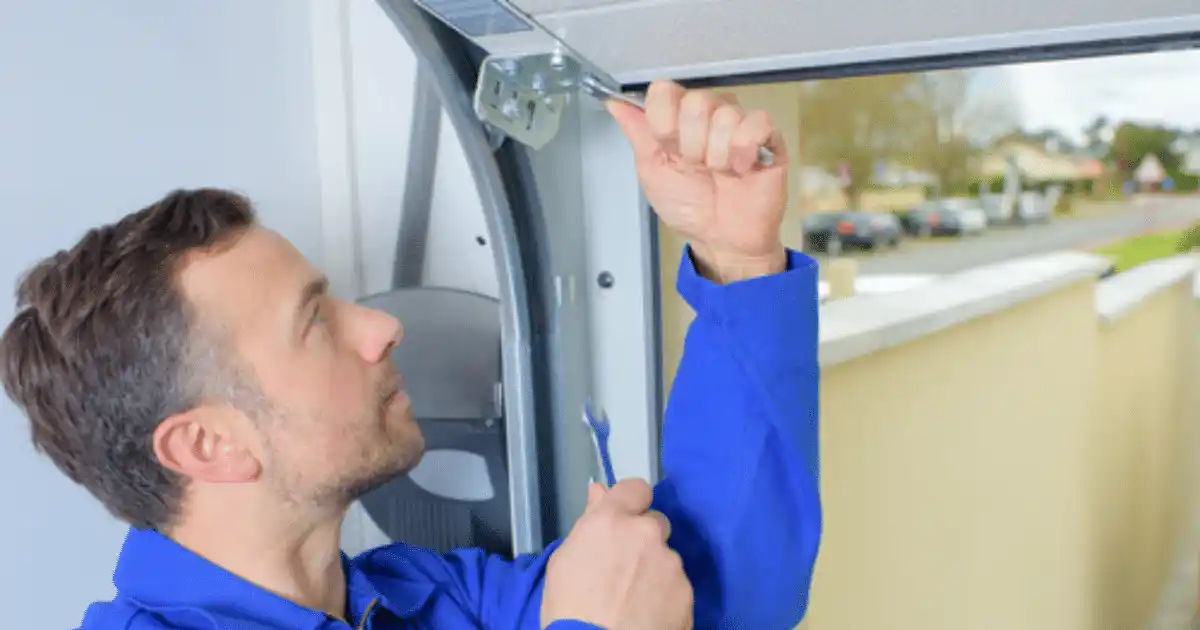
Step 4: Install the Ceiling Bracket and Secure the New Unit Attach the ceiling mounting bracket at the correct header height above the door opening. Lift the assembled opener unit and secure it firmly to the bracket and the wall support.
Step 5: Connect the Drive Arm to the Door Attach the straight or curved drive arm to the door bracket. This connection links the trolley to the garage door and is what physically moves the door during operation.
Step 6: Wire the Safety Sensors and Wall Button Position the safety sensors on each side of the door frame, approximately four to six inches from the floor. Connect the sensor wiring to the motor unit. Run the wall button wire from the button to the unit as well.
Step 7: Test, Set Travel Limits, and Program Remotes Plug the unit in and run a full test cycle. Adjust the open and close travel limits following the manufacturer’s instructions. Test the auto-reverse feature by placing a flat board on the ground under the door and confirming that the door reverses when it makes contact. Program all remotes and set up any smart features included with the unit.
Common Mistakes to Avoid During a Garage Door Opener Replacement
Even well-prepared homeowners can run into avoidable problems during installation. Being aware of these common errors ahead of time can save you hours of troubleshooting and prevent potential safety hazards.
Mistakes to avoid include:
- Skipping the door balance check before installation. If the springs are not properly tensioned, the new opener will constantly work against the imbalance, which shortens its lifespan and puts extra strain on the motor.
- Not reading the installation manual for the specific model. Every unit has different requirements. Skipping the manual often leads to incorrect limit settings or improper wiring that affects performance from the start.
- Misaligning the safety sensors. Even a minor angle in sensor placement can cause the door to refuse to close, reverse unexpectedly, or fail to detect an obstacle below.
- Reusing old or incompatible hardware. Old brackets, rails, and arms may not be compatible with the new unit and can compromise the stability of the entire installation.
- Skipping the auto-reverse safety test. This is a critical safety check that should always becompleted after installation. According to the U.S. Consumer Product Safety Commission’s publication on non-reversing garage door openers, auto-reverse sensors are among the most important protective features on any modern garage door system, and homeowners should test door openers monthly to ensure they reverse on contact with an obstruction.
- Overtightening the chain or belt drive. Excess tension causes premature wear on the trolley, the drive mechanism, and the motor itself.
If you are installing a LiftMaster system or another smart opener that requires post-installation calibration, the setup does not end when the hardware is in place. Simple Tips for Adjusting a LiftMaster Garage Door Opener walks through the key calibration steps that ensure your new unit is dialed in and performing at its best from the start.
Preventive Tips to Keep Your New Opener Running Longer
A replacement opener is a real investment, and regular maintenance helps protect it. With consistent attention to a few basic tasks, most quality units can last well beyond their average projected lifespan.
Practical garage door maintenance tips include:
- Apply a proper garage door lubricant to the moving parts every six months. Focus on the chain or belt, the rollers, and the hinges. Avoid using general-purpose spray products that are designed as degreasers rather than actual lubricants.
- Clean and check the safety sensors monthly. Wipe the lens of each sensor with a soft cloth and confirm that the alignment indicator lights are showing a steady signal on both sides.
- Run the auto-reverse test at least twice a year. Place a flat board on the ground under the door and confirm the door reverses on contact. This simple safety habit can prevent serious accidents.
- Check the remote batteries on a regular basis. Weak batteries are one of the most frequent and easily overlooked causes of inconsistent remote performance.
- Keep the door tracks clean and free of debris. Dirt, dust, and built-up grime in the tracks create resistance that forces the opener motor to work harder than it should.
- Schedule a professional inspection every one to two years. According to The Home Depot’s garage door maintenance guide, it’s best to work through a maintenance checklist at least once a year, ideally in the spring or fall, to avoid seasonal issues and catch small problems early Garage Door Maintenance Tips – The Home Depot
In Torrance, CA, the combination of coastal humidity and salt air can accelerate corrosion on metal components, including the chain, brackets, and rail hardware. Homeowners in this area benefit from applying lubricant more frequently and scheduling inspections on a slightly shorter interval compared to inland locations.
When Professional Installation Makes More Sense Than DIY
Handling a garage door opener replacement yourself is a realistic option for homeowners who are comfortable working with tools and following detailed technical instructions. That said, there are situations where calling a professional technician is the clearer, safer choice.
Consider professional installation when:
- The garage door springs need to be replaced. Torsion and extension springs store a significant amount of mechanical energy and can cause serious injuries if handled without the proper tools and professional training.
- The tracks are bent or significantly misaligned. Track repairs require precise adjustments that affect the alignment and operation of the entire door system.
- Your garage has a non-standard ceiling height or unusual layout. These configurations often call for custom mounting solutions that go beyond a standard installation.
- The existing wiring is outdated or unclear. Incorrect electrical connections can damage the new opener or create ongoing safety concerns.
- You are installing an advanced smart opener system. Units that include integrated cameras, multiple access levels, or full home automation compatibility can involve a more involved setup process that benefits from professional expertise.
Professional garage door installation typically includes a labor warranty alongside the manufacturer’s product warranty, which adds a meaningful layer of protection for your investment. Average installation costs vary based on the type of opener and the complexity of the job, but the peace of mind that comes with a professionally installed, fully tested system is generally well worth it for most homeowners.
Your Next Step Toward a Smoother, More Reliable Garage in Torrance
Replacing a garage door opener is the kind of home upgrade that pays off from the very first day. Quieter operation, stronger security, smarter features, and the confidence that comes from having a modern, properly installed system are all immediate benefits. For homeowners in Torrance, CA, where garages often serve as extra storage space, home gyms, and everyday entry points, having a dependable opener is not just a convenience; it is an essential part of how the home functions.
When you are ready to move forward with your garage door opener replacement, G & G Garage Door is here to make the process straightforward and stress-free. Our experienced technicians serve the Torrance area with professional installation and dependable service built on years of hands-on experience. Contact us or give us a call to schedule your consultation today.