
Your garage door is one of the hardest-working parts of your home. It opens and closes multiple times a day, handles rain, heat, and everything in between, and still gets little attention until something goes wrong. When problems start showing up, adjusting a garage door opener is often the first place to start.
The issue is that most homeowners do not know what to check or where to begin. One wrong setting can cause the door to reverse unexpectedly, slam shut too fast, or refuse to close at all. None of those situations is good, especially in a busy area like Torrance, CA, where you rely on your garage every single day.
This guide breaks down exactly what adjusting a garage door opener involves, what signs to watch for, what to inspect before making any changes, and when it is time to call a trained technician instead of handling it yourself.

What Adjusting a Garage Door Opener Really Involves
Before doing anything to your opener, it helps to understand what “adjustment” actually covers. This is not just about pressing a button or flipping a switch. Adjusting a garage door opener typically touches several different areas of the system.
Here is what falls under this category:
- Travel limits: These tell the opener how far the door should travel when opening and closing. If the limits are off, the door stops too early or keeps running past where it should.
- Force settings: These control how much power the motor uses to move the door. Too much force and the door will not stop when it should. Too little and it reverses before closing completely.
- Sensor alignment: The safety sensors at the base of the tracks detect obstructions. When they are out of alignment, the door may not close at all.
- Hardware condition: Rollers, hinges, brackets, and tracks all affect how the opener performs. Adjusting the opener will not solve problems caused by worn or loose hardware.
If you have a LiftMaster unit at home, Simple Tips for Adjusting a LiftMaster Garage Door Opener covers the model-specific steps that apply directly to that brand.
Understanding these four areas makes the rest of this guide much easier to follow.
Top less
Most opener problems do not appear overnight. They build slowly, and the early signs are easy to miss if you are not watching for them. Here are the most common indicators that adjusting a garage door opener has become necessary.
- The Door Reverses Before It Fully Closes. This is one of the most common complaints from homeowners. The door starts going down, then suddenly reverses back up before it reaches the floor. In most cases, the force setting is telling the opener it has met resistance when it has not. A small adjustment to the closing force or travel limit usually resolves this.
- The Door Stops Short of Opening All the Way. If the door only opens partway and then stops, the open travel limit is set too low. The motor is stopping earlier than it should. Adjusting this limit extends how far the door travels before the motor shuts off.
- Grinding or Scraping Sounds During Operation. Unusual sounds coming from the door are almost always a sign of a mechanical issue rather than an opener settings problem. Worn rollers, loose brackets, or dirty tracks are the usual causes. Ignoring grinding sounds leads to more expensive repairs over time.
- The Door Moves Too Fast or Too Slow. A door that closes too fast is a safety hazard. A door that drags along the tracks is a sign of excessive friction or a motor struggling to do its job. Both situations point to settings or hardware that need attention.
- The Remote Control Acts Inconsistently. If the remote only works at close range or works at certain times and not others, check the antenna on the opener unit before changing any settings. A dangling or obstructed antenna is a common and easily overlooked cause of remote signal problems.
- Safety Sensors Keep Blinking. The sensors near the bottom of the tracks should have solid indicator lights when they are properly aligned. If the lights are blinking or one is amber instead of green, the sensors are out of position. This can prevent the door from closing and is one of the most important issues to address quickly.
- The Door Shakes or Wobbles Along the Track. A door that vibrates or shakes during operation is not just an annoyance. It puts stress on the opener, the rollers, and the tracks over time. Loose hardware is usually the cause, though bent tracks require professional attention.
5 Things to Inspect Before Touching Any Settings
Changing the settings on your opener without first checking the hardware is a common mistake. If the underlying problem is physical, no amount of electronic adjustment will make a lasting difference. Run through this checklist before adjusting anything.
- Inspect the Tracks on Both Sides. The tracks guide the door as it travels up and down. Check both sides for dents, bends, or gaps between the rollers and the track surface. Even a minor misalignment can cause the door to drag or jump off the track entirely.
- Test the Door Balance. Disconnect the opener by pulling the red emergency release cord. Manually lift the door to about waist height and let go. A well-balanced door stays in place. If it drops or shoots upward, the springs are not providing the correct amount of tension. This is not something to adjust on your own.
- Inspect the Safety Sensors. Walk to the bottom of the tracks and check both garage door safety sensors. They should face each other directly with nothing blocking the beam between them. Confirm both indicator lights are solid. Clean the lenses with a soft, dry cloth if they appear dirty or dusty.
- Review the Springs. The springs above the door handle most of its weight. Visually check for any visible gaps in a torsion spring or any signs of wear on extension springs. If you notice damage, contact a technician. Attempting to repair or replace garage door springs without the right tools is dangerous.
- Tighten Loose Hardware. With the door closed, go around and check all the bolts on the track brackets, roller brackets, and panel hinges. A basic socket wrench is all it takes to tighten anything that has worked loose from daily vibration.
How to Adjust Garage Door Openers: 4 Core Settings That Matter

With the hardware confirmed in good shape, you can take a closer look at the opener settings. According to the garage door safety tips from DASMA, garage doors are among the largest moving parts in any home, and proper adjustment is directly tied to reducing the risk of injuries.
Here are the four adjustments that matter most:
- Travel Limit Settings. Travel limits define the stopping point for the door in both the open and closed directions. Most openers have two labeled adjustment screws or digital controls marked “Up Limit” and “Down Limit.” Turning the down limit slightly inward tells the motor to run a little longer before stopping. Small turns make a noticeable difference, so adjust gradually.
- Force Sensitivity Controls. Force settings determine how much resistance the motor will push against before stopping or reversing. The down-force (closing force) and up-force (opening force) are typically adjusted separately. For safety, the closing force should be set low enough so the door reverses if it contacts any resistance on the way down.
- Safety Sensor Alignment. If the sensors are out of position, loosen the wing nut or bracket screw holding the misaligned sensor. Slowly move it until both indicator lights are solid, then retighten. Confirming the beam is clear, and both lights are on solid, is the final step before testing the door.
- Lubricating the Moving Parts. Proper lubrication of the rollers, hinges, and springs reduces friction and noise. Use a lubricant spray designed specifically for garage doors. Apply it to the hinges, rollers, springs, and the drive chain or screw if your opener uses one. Avoid general-purpose sprays that can attract dirt and wear down faster.
8 Preventive Maintenance Tips to Avoid Common Opener Problems
Routine inspections are the most effective way to extend the life of a garage door system. According to Lowe’s garage door maintenance guide, regular monthly maintenance checks and twice-yearly upkeep can prevent the majority of emergency repairs.
Here are eight practical habits that make a real difference:
- Test the auto-reverse feature every month. Place a flat piece of scrap wood on the ground under the door and close it. The door should reverse when it makes contact with the board.
- Lubricate moving parts twice a year. Rollers, hinges, springs, and the drive mechanism all benefit from regular lubrication, especially before and after winter.
- Wipe down the tracks regularly. Use a dry cloth to remove dirt and debris from the track surface. Do not apply lubricant to the tracks themselves, as this can cause slipping.
- Inspect the bottom weather seal. A cracked or torn seal lets in moisture, insects, and debris. Replacing it is inexpensive and extends the life of the door.
- Check remote batteries regularly. Weak batteries cause inconsistent remote performance that is often mistaken for a signal or programming issue.
- Tighten hardware annually. Go around once a year and snug up any bolts or nuts that have loosened from routine vibration.
- Keep the area around the sensors clear. Leaves, dust, and small objects can interfere with the sensor beam and cause unexpected door behavior.
- Schedule a professional inspection once a year. A trained technician can catch worn springs, fraying cables, and other issues that are not obvious to the average homeowner.
For homeowners with a Genie unit, Genie Garage Door Openers Programming: A Step-by-Step Guide walks through the specific steps for getting that system properly configured and functioning.
When the Job Belongs to a Professional
Knowing when to step back is just as important as knowing when to step in. Some garage door repairs involve components that are genuinely dangerous to handle without professional training and the right equipment.
Call a technician when you encounter any of the following:
- Broken or damaged springs. Torsion springs and extension springs are under extreme tension. A spring failure can cause serious injury if handled without the proper tools and training.
- Bent or heavily misaligned tracks. Forcing the door to operate on damaged tracks risks damaging the opener, the panels, and the rollers.
- A motor that hums but does not move the door. This usually points to a stripped gear, a disconnected trolley, or an internal mechanical failure.
- Electrical problems with the opener unit. Sparking, tripping breakers, or intermittent power loss are not DIY repairs.
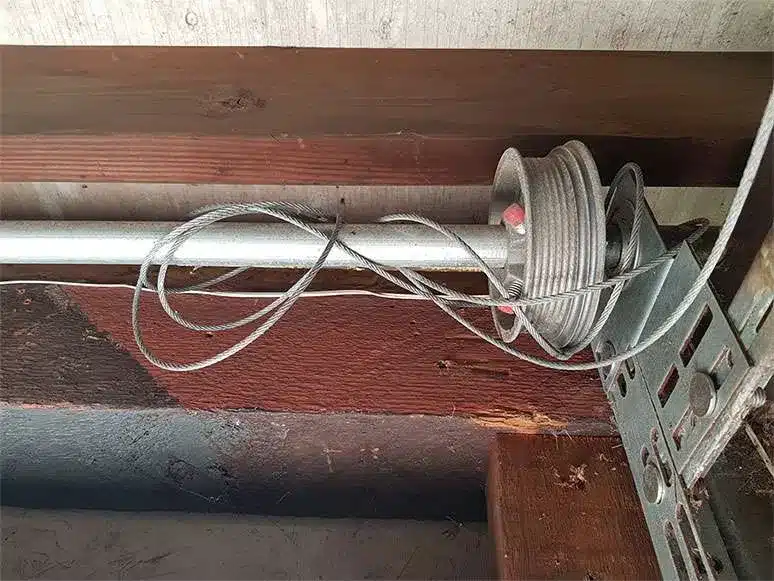
- Frayed or damaged cables. The cables that support the door are tightly tensioned and should only be handled by a professional.
Average costs for these types of repairs vary depending on the brand, the specific part, and the extent of the issue. Getting an estimate from a qualified technician is always the right first step before committing to any repair.
Ready to Stop Guessing and Start Getting It Right?
Adjusting a garage door opener is not always complicated, but it does require a methodical approach. Rushing through settings without first checking the hardware, sensors, and balance leads to misdiagnosed problems and missed repairs. Taking a few extra minutes to work through a proper inspection first saves time, money, and frustration.
For homeowners in Torrance, CA who would rather leave it to the professionals, G & G Garage Door is here to help. Our experienced technicians handle everything from minor adjustments to full system repairs with the kind of care and attention your home deserves. Contact us or give us a call to schedule your consultation today.